So for the people who have known me for a very long time you will know what I am talking about without having to go in to too much detail as to what I am working on. For those of you who do not know me well I will briefly describe what I am working on.
Back in the winter of 1982 – 1983 I awoke in the middle of the night one evening from a dream where I was playing a game. I lit up a smoke and and quickly drew out a rough version of the game and went back to sleep. I thought about this game off and on for about 5 years before I actually created a prototype.
Over the years I have tried various ways of making these prototypes that generally involved wood beginning with taking a broom handle and planing it to a long hexagonal rod that I would then cut to my desired lengths. Then I would take these cut off tiles as I call them and then spray paint them with plastic paint. Surprising how much paint it would take as the wood would absorb the paint.
Once armed with my painted tiles I would then apply the information to each tile by hand. In the beginning it was all hand drawn that eventually became decals. These looked pretty good but not very cost effective so I continued to find an easier and cheaper way to create these tiles.
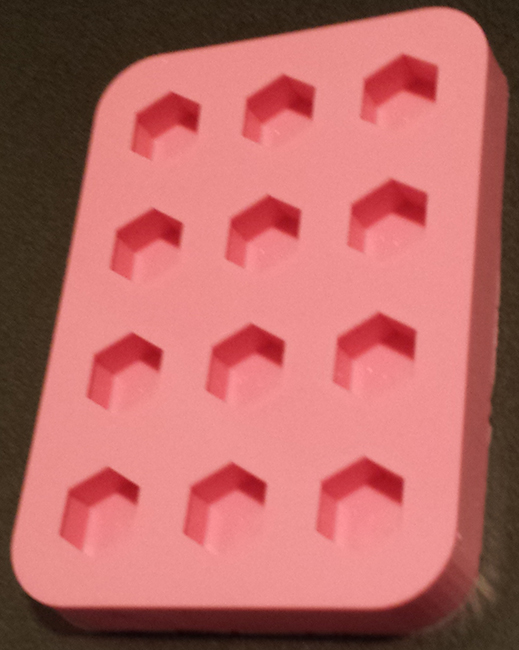
Fast forward a few years and my meeting with a Fellow named Ken who introduced me to the world of hand mold making and a product called Smooth-on. This system, while not perfect, seemed to be a possible solution for my “on demand” printing solution. Of course the making of the molds required a positive to use as the source and for that we went to wood once again.
Fast forward a few years more and I check out 3D printing to make my molds. Viola – very precise positives to work from.
This sample is 7.5 X 5.5 inches and took approximately 11.5 hours to print and cost $280.00. The plastic is kind of sticky to the touch for some reason and while it looks strong and durable the reality is that it is not quite that tough. I guess it makes sense when you take in to consideration that it is printed by laying 1 thin strand of plastic, about the thickness of a human hair, upon the previous strand until you have built up enough layers to finish your finished print.
They all do not work that way but the one I used did and this was not a cheap 3D Printer as it was a commercial grade printer that cost upwards of $50,000.00.
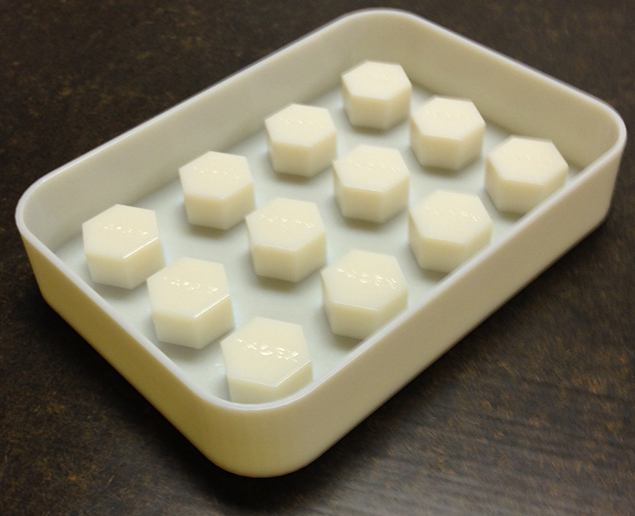
Armed with my new 3D Printed prototype that would allow me to make a dozen blank tiles at a time I mix up a batch of Smooth-On mold making goop and proceed to make my first mold – or so I thought.
The molding material takes 24 hours to cure so I wait a solid day before I make the attempt to de-mold. Having never used this material before I soon discover that removing the mold from the positive is going to be a lot harder than I thought. Not only does this rubber grip everything tightly but there is actually no place for me to grab the mold as the sides of the positive are higher than the mold surface.
I was hoping to use the positive to make at least 6 molds but I am fearful that I am going to have to break my positive to get access my mold. It took me over an hour to coax up an edge of the mold high enough to clear the edge of the positive so I could grip the mold and pull it out of the positive. In the process I actually cracked the floor of the positive and while I will be able to use it to make at least one more mold I am hopeful that by gluing the positive to a stronger surface I will be able to get my 6 molds.
I guess the take away from this would be that while 3D Printing Rapid Prototyping is a fast way to make your molds you have to keep in mind that they are not that strong. If you are going to be using this method to make your molds then you would be well advised to reinforce the prototype by gluing Plexiglas panels to the bottom and sides as the forces required to de-mold may break your 3D printed prototype.
I will continue to use this process to make my components so that I can “Print on Demand” my game creations.
